Frontline is one of the most exciting modes in World of Tanks where you compete with your Tier VIII vehicles. Join massive 30x30 battles featuring the dynamic battle scenarios system. Use your Combat Reserves, try out respawn mechanics, and take advantage of Resupply Circles!
To switch to Frontline mode, click the mode selection menu to the right of the Battle! button and select Frontline. The Frontline icon appears in your Garage.

Kick-off
There will be several launches of Frontline this year. Between these launches, Frontline will be closed.
After the start of each launch, from 02:00 until 04:00 (UTC), you will not be able to join battles in Frontline.
The dates of the official mode launch will be announced in our web portal news.
General Overview
- Battle format: 30x30.
- Vehicles: Tier VIII vehicles.
- Objectives: five high-caliber guns at the rear of the defending team's territory. The attacking team must destroy three of them. The defenders must protect these objectives repelling enemy attacks until the battle time elapses.
- Maps: Normandie, Kraftwerk, and Fata Morgana.
Mode Rules
Frontline battles follow special rules that differ from those of Random Battles. Below, you can find detailed information about the tide of battles and key mechanics of the mode.
Tide of Battles and Main Objectives
Combat takes place on one of three maps: Normandie, Kraftwerk, or Fata Morgana. The total area of any map is 9 square kilometers. Each map provides the following three horizontal lines:
- The first line (sectors A, B, and C). This is where both teams are located at the beginning of the battle. The teams are evenly distributed across the line: 10 vehicles of each team are based in every sector.
- The second line (sectors D, E, and F). The battle proceeds to the second line once the attacking team captures at least one base of the first line.
- The third line (not divided into sectors). The main objectives, high-caliber guns, are located here. To access this line, the attackers must capture any sector of the second line.
- Normandie
- Kraftwerk
- Fata Morgana


The map has five pillboxes. As soon as attackers capture at least one sector within the 2nd defensive front, they can embark on their primary mission: Destroy the pillboxes, long-range guns each with their own HP pool. Pillboxes are protected by armored hoods and are virtually impenetrable when faced head-on. Aim at their rear, where there is significantly thinner armor. The attacking team wins as soon as they destroy three pillboxes.
 Active
 Destroyed
 Active
 Destroyed

There are special spots scattered across the active combat area where you can restore HP, repair modules, and replenish ammo and consumables.
Resupply Circles have a cooldown time. Once you have repaired your vehicle to 100%, you must wait 120 seconds before you can use it again. If you are hit while in a Resupply Circle, you must wait an additional 5 minutes to stock up on rounds and finish repairing the vehicle.


An area of the map where the attacking team can gain control over a particular front. Standard base capture mechanics apply: Once the attacking vehicles enter the circle, the front begins being captured. When the attackers capture a base, they take control of the entire zone, and the next zone (vertically) becomes available for capture.
 Captured zone
 Uncaptured zone

An area of the map where the attacking team can gain control over a particular front. Standard base capture mechanics apply: Once the attacking vehicles enter the circle, the front begins being captured. When the attackers capture a base, they take control of the entire zone, and the next zone (vertically) becomes available for capture.
Captured zone Uncaptured zone
The map has five pillboxes. As soon as attackers capture at least one sector within the 2nd defensive front, they can embark on their primary mission: Destroy the pillboxes, long-range guns each with their own HP pool. Pillboxes are protected by armored hoods and are virtually impenetrable when faced head-on. Aim at their rear, where there is significantly thinner armor. The attacking team wins as soon as they destroy three pillboxes.
Active Destroyed Active Destroyed
The map has five pillboxes. As soon as attackers capture at least one sector within the 2nd defensive front, they can embark on their primary mission: Destroy the pillboxes, long-range guns each with their own HP pool. Pillboxes are protected by armored hoods and are virtually impenetrable when faced head-on. Aim at their rear, where there is significantly thinner armor. The attacking team wins as soon as they destroy three pillboxes.
Active Destroyed Active Destroyed There are special spots scattered across the active combat area where you can restore HP, repair modules, and replenish ammo and consumables.
Resupply Circles have a cooldown time. Once you have repaired your vehicle to 100%, you must wait 120 seconds before you can use it again. If you are hit while in a Resupply Circle, you must wait an additional 5 minutes to stock up on rounds and finish repairing the vehicle.
There are special spots scattered across the active combat area where you can restore HP, repair modules, and replenish ammo and consumables.
Resupply Circles have a cooldown time. Once you have repaired your vehicle to 100%, you must wait 120 seconds before you can use it again. If you are hit while in a Resupply Circle, you must wait an additional 5 minutes to stock up on rounds and finish repairing the vehicle.


An area of the map where the attacking team can gain control over a particular front. Standard base capture mechanics apply: Once the attacking vehicles enter the circle, the front begins being captured. When the attackers capture a base, they take control of the entire zone, and the next zone (vertically) becomes available for capture.
Captured zone Uncaptured zone There are special spots scattered across the active combat area where you can restore HP, repair modules, and replenish ammo and consumables.
Resupply Circles have a cooldown time. Once you have repaired your vehicle to 100%, you must wait 120 seconds before you can use it again. If you are hit while in a Resupply Circle, you must wait an additional 5 minutes to stock up on rounds and finish repairing the vehicle.
There are special spots scattered across the active combat area where you can restore HP, repair modules, and replenish ammo and consumables.
Resupply Circles have a cooldown time. Once you have repaired your vehicle to 100%, you must wait 120 seconds before you can use it again. If you are hit while in a Resupply Circle, you must wait an additional 5 minutes to stock up on rounds and finish repairing the vehicle.


An area of the map where the attacking team can gain control over a particular front. Standard base capture mechanics apply: Once the attacking vehicles enter the circle, the front begins being captured. When the attackers capture a base, they take control of the entire zone, and the next zone (vertically) becomes available for capture.
Captured zone Uncaptured zone There are special spots scattered across the active combat area where you can restore HP, repair modules, and replenish ammo and consumables.
Resupply Circles have a cooldown time. Once you have repaired your vehicle to 100%, you must wait 120 seconds before you can use it again. If you are hit while in a Resupply Circle, you must wait an additional 5 minutes to stock up on rounds and finish repairing the vehicle.


An area of the map where the attacking team can gain control over a particular front. Standard base capture mechanics apply: Once the attacking vehicles enter the circle, the front begins being captured. When the attackers capture a base, they take control of the entire zone, and the next zone (vertically) becomes available for capture.
Captured zone Uncaptured zone

An area of the map where the attacking team can gain control over a particular front. Standard base capture mechanics apply: Once the attacking vehicles enter the circle, the front begins being captured. When the attackers capture a base, they take control of the entire zone, and the next zone (vertically) becomes available for capture.
Captured zone Uncaptured zone 
The map has five pillboxes. As soon as attackers capture at least one sector within the 2nd defensive front, they can embark on their primary mission: Destroy the pillboxes, long-range guns each with their own HP pool. Pillboxes are protected by armored hoods and are virtually impenetrable when faced head-on. Aim at their rear, where there is significantly thinner armor. The attacking team wins as soon as they destroy three pillboxes.
Active Destroyed Active Destroyed 
An area of the map where the attacking team can gain control over a particular front. Standard base capture mechanics apply: Once the attacking vehicles enter the circle, the front begins being captured. When the attackers capture a base, they take control of the entire zone, and the next zone (vertically) becomes available for capture.
Captured zone Uncaptured zone 
There are special spots scattered across the active combat area where you can restore HP, repair modules, and replenish ammo and consumables.
Resupply Circles have a cooldown time. Once you have repaired your vehicle to 100%, you must wait 120 seconds before you can use it again. If you are hit while in a Resupply Circle, you must wait an additional 5 minutes to stock up on rounds and finish repairing the vehicle.
An area of the map where the attacking team can gain control over a particular front. Standard base capture mechanics apply: Once the attacking vehicles enter the circle, the front begins being captured. When the attackers capture a base, they take control of the entire zone, and the next zone (vertically) becomes available for capture.
Captured zone Uncaptured zone There are special spots scattered across the active combat area where you can restore HP, repair modules, and replenish ammo and consumables.
Resupply Circles have a cooldown time. Once you have repaired your vehicle to 100%, you must wait 120 seconds before you can use it again. If you are hit while in a Resupply Circle, you must wait an additional 5 minutes to stock up on rounds and finish repairing the vehicle.
There are special spots scattered across the active combat area where you can restore HP, repair modules, and replenish ammo and consumables.
Resupply Circles have a cooldown time. Once you have repaired your vehicle to 100%, you must wait 120 seconds before you can use it again. If you are hit while in a Resupply Circle, you must wait an additional 5 minutes to stock up on rounds and finish repairing the vehicle.
The map has five pillboxes. As soon as attackers capture at least one sector within the 2nd defensive front, they can embark on their primary mission: Destroy the pillboxes, long-range guns each with their own HP pool. Pillboxes are protected by armored hoods and are virtually impenetrable when faced head-on. Aim at their rear, where there is significantly thinner armor. The attacking team wins as soon as they destroy three pillboxes.
Active Destroyed Active Destroyed The map has five pillboxes. As soon as attackers capture at least one sector within the 2nd defensive front, they can embark on their primary mission: Destroy the pillboxes, long-range guns each with their own HP pool. Pillboxes are protected by armored hoods and are virtually impenetrable when faced head-on. Aim at their rear, where there is significantly thinner armor. The attacking team wins as soon as they destroy three pillboxes.
Active Destroyed Active Destroyed The map has five pillboxes. As soon as attackers capture at least one sector within the 2nd defensive front, they can embark on their primary mission: Destroy the pillboxes, long-range guns each with their own HP pool. Pillboxes are protected by armored hoods and are virtually impenetrable when faced head-on. Aim at their rear, where there is significantly thinner armor. The attacking team wins as soon as they destroy three pillboxes.
Active Destroyed Active Destroyed The map has five pillboxes. As soon as attackers capture at least one sector within the 2nd defensive front, they can embark on their primary mission: Destroy the pillboxes, long-range guns each with their own HP pool. Pillboxes are protected by armored hoods and are virtually impenetrable when faced head-on. Aim at their rear, where there is significantly thinner armor. The attacking team wins as soon as they destroy three pillboxes.
Active Destroyed Active Destroyed There are special spots scattered across the active combat area where you can restore HP, repair modules, and replenish ammo and consumables.
Resupply Circles have a cooldown time. Once you have repaired your vehicle to 100%, you must wait 120 seconds before you can use it again. If you are hit while in a Resupply Circle, you must wait an additional 5 minutes to stock up on rounds and finish repairing the vehicle.
There are special spots scattered across the active combat area where you can restore HP, repair modules, and replenish ammo and consumables.
Resupply Circles have a cooldown time. Once you have repaired your vehicle to 100%, you must wait 120 seconds before you can use it again. If you are hit while in a Resupply Circle, you must wait an additional 5 minutes to stock up on rounds and finish repairing the vehicle.
There are special spots scattered across the active combat area where you can restore HP, repair modules, and replenish ammo and consumables.
Resupply Circles have a cooldown time. Once you have repaired your vehicle to 100%, you must wait 120 seconds before you can use it again. If you are hit while in a Resupply Circle, you must wait an additional 5 minutes to stock up on rounds and finish repairing the vehicle.
An area of the map where the attacking team can gain control over a particular front. Standard base capture mechanics apply: Once the attacking vehicles enter the circle, the front begins being captured. When the attackers capture a base, they take control of the entire zone, and the next zone (vertically) becomes available for capture.
Captured zone Uncaptured zone An area of the map where the attacking team can gain control over a particular front. Standard base capture mechanics apply: Once the attacking vehicles enter the circle, the front begins being captured. When the attackers capture a base, they take control of the entire zone, and the next zone (vertically) becomes available for capture.
Captured zone Uncaptured zone There are special spots scattered across the active combat area where you can restore HP, repair modules, and replenish ammo and consumables.
Resupply Circles have a cooldown time. Once you have repaired your vehicle to 100%, you must wait 120 seconds before you can use it again. If you are hit while in a Resupply Circle, you must wait an additional 5 minutes to stock up on rounds and finish repairing the vehicle.
There are special spots scattered across the active combat area where you can restore HP, repair modules, and replenish ammo and consumables.
Resupply Circles have a cooldown time. Once you have repaired your vehicle to 100%, you must wait 120 seconds before you can use it again. If you are hit while in a Resupply Circle, you must wait an additional 5 minutes to stock up on rounds and finish repairing the vehicle.

The map has five pillboxes. As soon as attackers capture at least one sector within the 2nd defensive front, they can embark on their primary mission: Destroy the pillboxes, long-range guns each with their own HP pool. Pillboxes are protected by armored hoods and are virtually impenetrable when faced head-on. Aim at their rear, where there is significantly thinner armor. The attacking team wins as soon as they destroy three pillboxes.
Active Destroyed Active Destroyed 
There are special spots scattered across the active combat area where you can restore HP, repair modules, and replenish ammo and consumables.
Resupply Circles have a cooldown time. Once you have repaired your vehicle to 100%, you must wait 120 seconds before you can use it again. If you are hit while in a Resupply Circle, you must wait an additional 5 minutes to stock up on rounds and finish repairing the vehicle.

An area of the map where the attacking team can gain control over a particular front. Standard base capture mechanics apply: Once the attacking vehicles enter the circle, the front begins being captured. When the attackers capture a base, they take control of the entire zone, and the next zone (vertically) becomes available for capture.
Captured zone Uncaptured zone An area of the map where the attacking team can gain control over a particular front. Standard base capture mechanics apply: Once the attacking vehicles enter the circle, the front begins being captured. When the attackers capture a base, they take control of the entire zone, and the next zone (vertically) becomes available for capture.
Captured zone Uncaptured zone The map has five pillboxes. As soon as attackers capture at least one sector within the 2nd defensive front, they can embark on their primary mission: Destroy the pillboxes, long-range guns each with their own HP pool. Pillboxes are protected by armored hoods and are virtually impenetrable when faced head-on. Aim at their rear, where there is significantly thinner armor. The attacking team wins as soon as they destroy three pillboxes.
Active Destroyed Active Destroyed The map has five pillboxes. As soon as attackers capture at least one sector within the 2nd defensive front, they can embark on their primary mission: Destroy the pillboxes, long-range guns each with their own HP pool. Pillboxes are protected by armored hoods and are virtually impenetrable when faced head-on. Aim at their rear, where there is significantly thinner armor. The attacking team wins as soon as they destroy three pillboxes.
Active Destroyed Active Destroyed The map has five pillboxes. As soon as attackers capture at least one sector within the 2nd defensive front, they can embark on their primary mission: Destroy the pillboxes, long-range guns each with their own HP pool. Pillboxes are protected by armored hoods and are virtually impenetrable when faced head-on. Aim at their rear, where there is significantly thinner armor. The attacking team wins as soon as they destroy three pillboxes.
Active Destroyed Active Destroyed The map has five pillboxes. As soon as attackers capture at least one sector within the 2nd defensive front, they can embark on their primary mission: Destroy the pillboxes, long-range guns each with their own HP pool. Pillboxes are protected by armored hoods and are virtually impenetrable when faced head-on. Aim at their rear, where there is significantly thinner armor. The attacking team wins as soon as they destroy three pillboxes.
Active Destroyed Active Destroyed There are special spots scattered across the active combat area where you can restore HP, repair modules, and replenish ammo and consumables.
Resupply Circles have a cooldown time. Once you have repaired your vehicle to 100%, you must wait 120 seconds before you can use it again. If you are hit while in a Resupply Circle, you must wait an additional 5 minutes to stock up on rounds and finish repairing the vehicle.
There are special spots scattered across the active combat area where you can restore HP, repair modules, and replenish ammo and consumables.
Resupply Circles have a cooldown time. Once you have repaired your vehicle to 100%, you must wait 120 seconds before you can use it again. If you are hit while in a Resupply Circle, you must wait an additional 5 minutes to stock up on rounds and finish repairing the vehicle.
There are special spots scattered across the active combat area where you can restore HP, repair modules, and replenish ammo and consumables.
Resupply Circles have a cooldown time. Once you have repaired your vehicle to 100%, you must wait 120 seconds before you can use it again. If you are hit while in a Resupply Circle, you must wait an additional 5 minutes to stock up on rounds and finish repairing the vehicle.
An area of the map where the attacking team can gain control over a particular front. Standard base capture mechanics apply: Once the attacking vehicles enter the circle, the front begins being captured. When the attackers capture a base, they take control of the entire zone, and the next zone (vertically) becomes available for capture.
Captured zone Uncaptured zone There are special spots scattered across the active combat area where you can restore HP, repair modules, and replenish ammo and consumables.
Resupply Circles have a cooldown time. Once you have repaired your vehicle to 100%, you must wait 120 seconds before you can use it again. If you are hit while in a Resupply Circle, you must wait an additional 5 minutes to stock up on rounds and finish repairing the vehicle.
There are special spots scattered across the active combat area where you can restore HP, repair modules, and replenish ammo and consumables.
Resupply Circles have a cooldown time. Once you have repaired your vehicle to 100%, you must wait 120 seconds before you can use it again. If you are hit while in a Resupply Circle, you must wait an additional 5 minutes to stock up on rounds and finish repairing the vehicle.
There are special spots scattered across the active combat area where you can restore HP, repair modules, and replenish ammo and consumables.
Resupply Circles have a cooldown time. Once you have repaired your vehicle to 100%, you must wait 120 seconds before you can use it again. If you are hit while in a Resupply Circle, you must wait an additional 5 minutes to stock up on rounds and finish repairing the vehicle.
An area of the map where the attacking team can gain control over a particular front. Standard base capture mechanics apply: Once the attacking vehicles enter the circle, the front begins being captured. When the attackers capture a base, they take control of the entire zone, and the next zone (vertically) becomes available for capture.
Captured zone Uncaptured zone There are special spots scattered across the active combat area where you can restore HP, repair modules, and replenish ammo and consumables.
Resupply Circles have a cooldown time. Once you have repaired your vehicle to 100%, you must wait 120 seconds before you can use it again. If you are hit while in a Resupply Circle, you must wait an additional 5 minutes to stock up on rounds and finish repairing the vehicle.
An area of the map where the attacking team can gain control over a particular front. Standard base capture mechanics apply: Once the attacking vehicles enter the circle, the front begins being captured. When the attackers capture a base, they take control of the entire zone, and the next zone (vertically) becomes available for capture.
Captured zone Uncaptured zone An area of the map where the attacking team can gain control over a particular front. Standard base capture mechanics apply: Once the attacking vehicles enter the circle, the front begins being captured. When the attackers capture a base, they take control of the entire zone, and the next zone (vertically) becomes available for capture.
Captured zone Uncaptured zone
Each sector of the first and the second line has a base. When the attacking team captures a base, they take control of the entire zone, and the next sector (vertically) becomes available for attack.
|
For example: Once the base in sector A is captured, the attackers can start combat actions in sector D. They will get access to sectors E and F after capturing sectors B and C correspondingly. |
Special rules of base capturing in Frontline:
- Causing damage to a vehicle capturing a base or to its modules does not reset capture points but only stops the capture progress of this vehicle for 5 seconds.
- To reset capture points of a vehicle capturing the base, destroy this vehicle or force it to leave the base circle.
- Upon reaching a certain number of base capture points, you no longer earn experience. This restriction is aimed at preventing potential abuse of the mechanics.
Once a sector has been lost, the defenders have 1 minute to leave it. When the time is over, all the defenders' vehicles in the captured zone are destroyed by an airstrike.
Respectively, vehicles of the attacking team are destroyed by an airstrike in the following cases:
- If they enter a zone of the second line without having captured the previous sector of the first line
- If they enter a zone of the third line when no sectors of the second line have been taken by them
The more bases of the first line are captured, the fewer points are required to capture the bases of the second line.
| Number of captured bases of the first line | Number of capture points required to take a base of the second line |
|---|---|
| 1 | 450 |
| 2 | 250 |
| 3 | 150 |
Objective Characteristics
Once attackers capture at least one sector on the second line, they can proceed to the third line and attack the main objectives—five gun turrets. All objectives share the same characteristics:

- Durability: 3,500 HP.
- Roof and frontal armor: cannot be penetrated or damaged with HE shells
- Side armor: 180 mm
- Rear armor: 90 mm
- Vulnerable points: door (70 mm) and ventilation (25 mm)
The high-caliber guns do not rotate or move but can spot enemy vehicles. Their maximum view range is 445 meters. They can transmit information about enemy positions to all allies because their Signal Range is unlimited.
Battle Duration
The basic battle duration in the Frontline mode is 12 minutes. Effective actions of the attacking team can extend this time. A captured base adds 2 minutes to the battle duration. Capturing the last base adds 4 minutes.
|
For example: The attackers captured 5 bases (A, B, C, E and F). Therefore, the battle duration has increased by 10 minutes and is now 22 minutes. Capturing base D will add 4 more minutes to the battle duration totalling 26 minutes. |
Overtime
Additional time starts if the battle time runs out and at least one vehicle of the attacking team is capturing a base.
The maximum overtime duration is 90 seconds. If the attackers fail to capture the base during this time, they lose.
Overtime ends earlier in the following cases:
- Base capture points are reduced to zero
- None of the attackers is capturing a base
Frontline Vehicles
To participate in Frontline, you need to have at least one Tier VIII vehicle in your Garage.
Rental Vehicles
If you do not have enough Tier VIII vehicles, you can rent them in the in-game Store via the ![]() (Best) section. Rental vehicles can be purchased during a whole period when the mode is available. Every day except the first, all offers have a discount.
(Best) section. Rental vehicles can be purchased during a whole period when the mode is available. Every day except the first, all offers have a discount.
All rental vehicles are replicas of the corresponding researchable vehicles in their top configurations. They can be used in Frontline only. Rental vehicles are available even if you already have the original version of the vehicle.
Rental vehicles are offered with temporary slots and crews trained to 100%. You can transfer crew members to a rental vehicle of the same nation and type for free and without the need for retraining.
When the rental period is over, the vehicle remains in your Garage but you cannot fight in it anymore.
Respawning in Battle
If your vehicle is destroyed in Frontline, the battle is still not over for you. You can respawn on the battlefield and continue fighting.
Once your vehicle is destroyed, the Respawn screen opens where you can select a new vehicle in which to return into battle. The same vehicle can also be used for respawning but only after at least 7 minutes have passed since it was destroyed.
When the battle starts, you have one vehicle for respawning in your reserve. Every 5 minutes, one more vehicle is added. The reserve can hold a maximum of 2 vehicles. If your vehicle is destroyed and you run out of vehicles in your reserve, you need to wait until new vehicles are delivered. After that, you can select a vehicle and get back to the battlefield.
Besides a vehicle, you also need to select a respawn point to return to the battle. You have several points to choose from. The respawn points where you are more likely to meet an enemy are marked with a special icon ![]() .
.
You cannot respawn in a sector where there are 12 other allies are already fighting.
Playing in an SPG, you are also unable to respawn in a sector with another allied SPG.

The respawn mechanics allow you to quickly move to another sector, for example, if you want to support your allies on the opposite flank. To go to the Respawn screen, press and hold J for 15 seconds. Note that your vehicle is self-destroyed in this case.
Resupply Circles
Resupply Circles are located on every line. There, you can restore vehicle hit points, repair damaged modules, treat all injured crew members, and resupply ammunition.
Resupply Circles are common to all players. There can be several vehicles in a Resupply Circle simultaneously.
A Resupply Circle is temporarily unavailable in one of the following cases:
- Once your vehicle is fully restored, you cannot use the same Resupply Circle during the following two minutes.
- Your vehicle receives damage in a Resupply Circle. In this case, the Resupply Circle becomes unavailable for 5 minutes.
After a battle, you are charged the full cost of the restored vehicle hit points, but no more than 100% of the vehicle’s durability. This rule is applied to destroyed vehicles as well.
|
For example: You used a Resupply Circle three times during a battle and restored 20% of your vehicle hit points each time. Therefore, you restored 60% of your vehicle HP and paid for it. Your ally restored 60% of their vehicle hit points twice. However, they paid for 100% of hit points, instead of 120%. Thus, repairs over the vehicle's full durability are free of charge. |
You are charged for all shells spent in battle. In this case, if the number of spent shells exceeds the ammo rack capacity, the cost of additional shells is deducted from your battle income.
|
For example: The ammo rack capacity of the LT-432 is 50 shells. Fighting in this tank, you resupplied ammunition in Resupply Circles and spent 70 shells total. The cost of 20 shells is deducted from your battle income, and the cost of the remaining 50 shells is charged during repairs. |


- Attack Reserves
- Recon Reserves
- Tactical Reserves

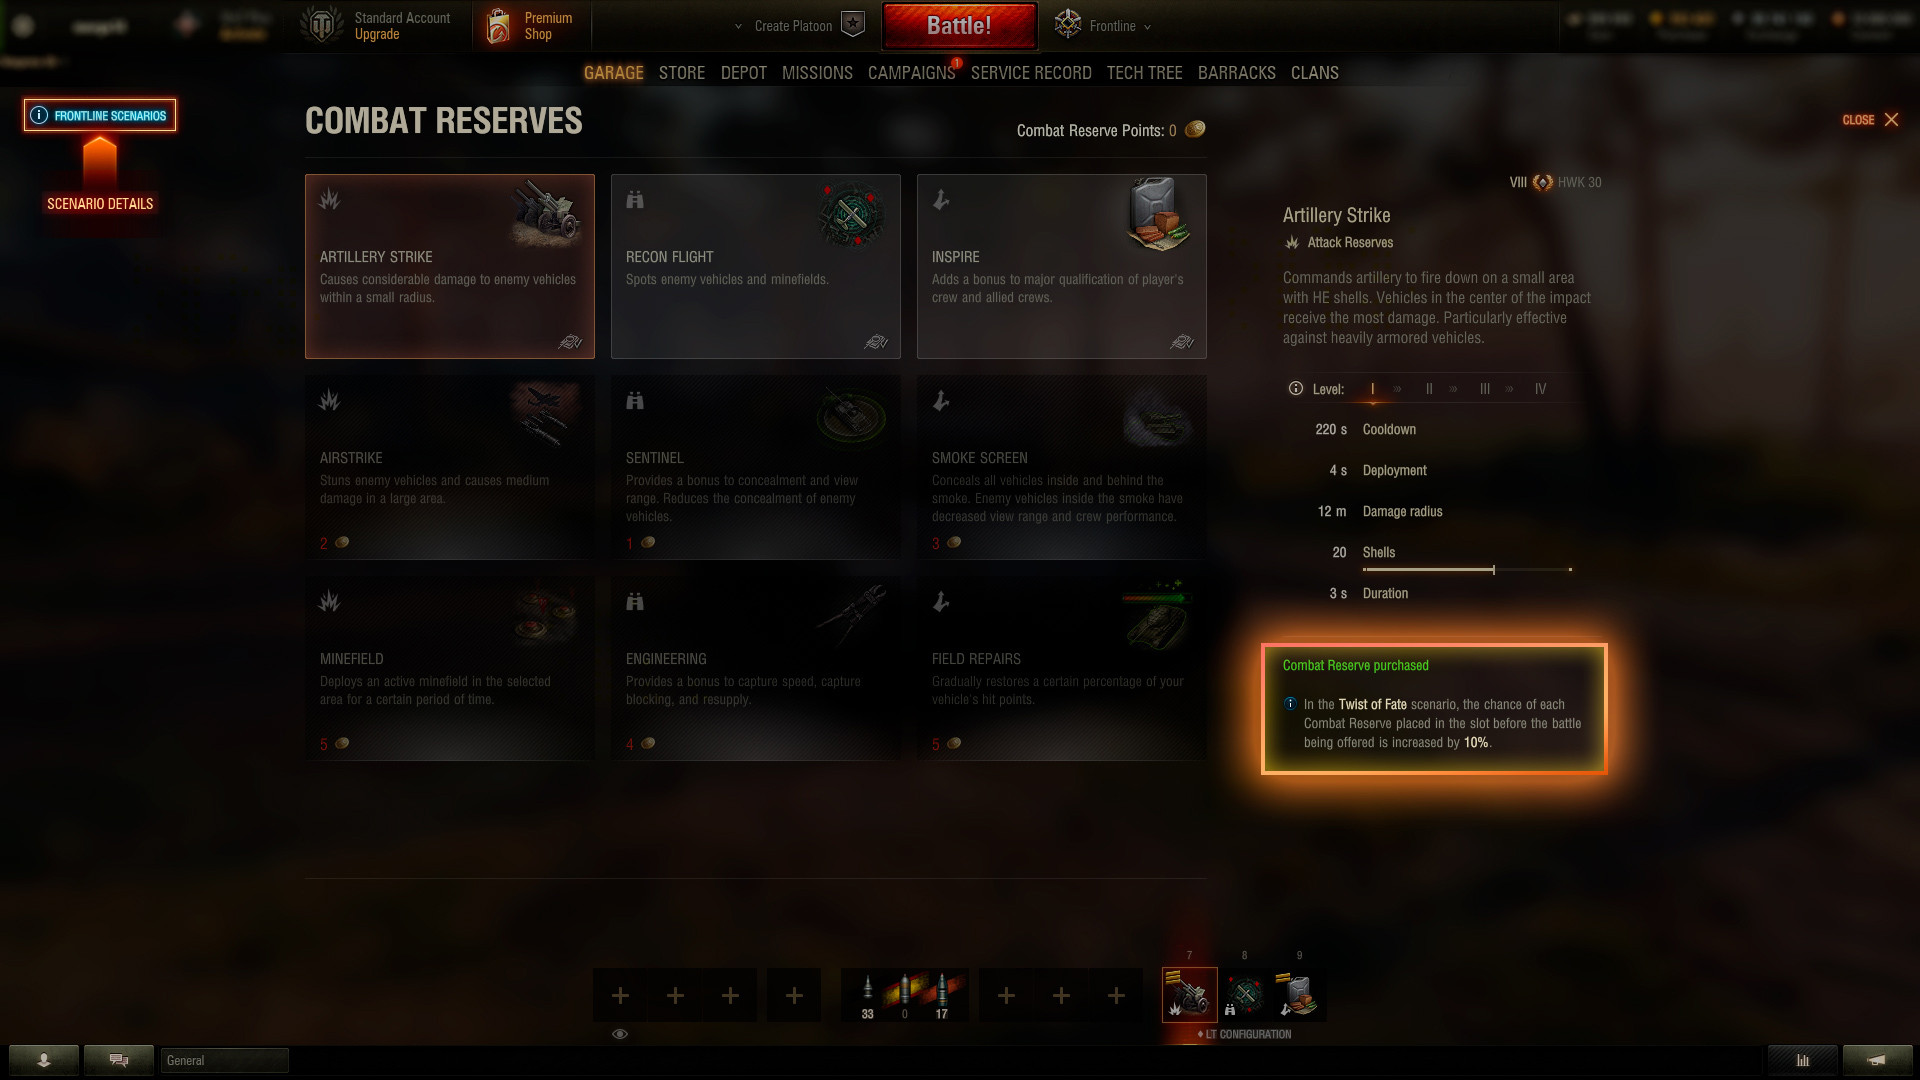
Artillery Strike
Commands artillery to lay down fire with HE shells on the selected area. Vehicles in the center of the impact area are heavily damaged.

Airstrike
Commands a ground-attack plane to drop bombs in the selected area, stunning and causing damage to enemy vehicles. Vehicles in the center of the impact area are heavily damaged.

Minefield
Deploys an active minefield in the selected area for a certain period of time. Mines can be destroyed by shots or explosions. Enemies can detect mines from close range or with the Recon Flight or Sentinel Combat Reserves. Minefield is activated 3 seconds after deployment.

Recon Flight
Commands a reconnaissance plane to spot a line in a large area. Vehicles in the plane's sight are spotted and remain visible for a certain duration. Detects minefields.

Engineering
Provides a bonus to capture speed or capture blocking. In addition, it reduces the time to refresh Resupply Circles and speeds up ammunition resupply.

Sentinel
Increases the concealment parameter of your vehicle 3 seconds after it stops moving and reduces the concealment of enemy vehicles, either moving or behind vegetation. Provides a passive bonus to view range and detects enemy mines. Does not work during vehicle movement.

Inspire
Improves the crew performance of the vehicle and of all allies within a particular radius, adding a % bonus to the major qualification of each crew member. A player who applies it will receive an improved effect.

Smoke Screen
Lays smoke screens that conceal allied vehicles. Enemy vehicles inside smoke have a decreased view range and crew efficiency.

Field Repair
Repairs all damaged modules and gradually restores a certain percentage of your vehicle's hit points. When active, it reduces the damage taken from mines and speeds up HP restoration of vehicles within a Resupply Circle.
A Combat Reserve can be mounted into a slot of the corresponding category only. Vehicles of all types have one slot of each category. However, each vehicle type features a distinct slot configuration.
| Slot 1 | Slot 2 | Slot 3 | |
| Light Tanks |  |
 |
 |
| Medium Tanks | |
|
|
| Heavy Tanks | |
|
|
| Tank Destroyers | |
|
|
| SPG | |
|
|
Slots unlock gradually in battle as you reach new ranks: the first slot is available from the start, while the second and third slots unlock upon reaching the Sergeant and Lieutenant ranks, respectively.
All Combat Reserves improve simultaneously after you reach the Captain and Major ranks.

|
For example: You entered a battle in the HWK 12 light tank with the following Combat Reserves mounted:
At the beginning of the battle, you can only use Engineering. Inspire will unlock after reaching the Sergeant rank and Artillery Strike upon reaching the Lieutenant rank. All three Reserves will be improved twice: to Reserve II when you reach the Captain rank, and to Reserve III once the Major rank is reached. |
Dynamic Battle Scenarios
In Frontline, you play by the rules of one of three scenarios defined randomly before the start of a battle. The difference are centered around Combat Reserves.
- Standard Battle (34% chance): Combat Reserves are used as per the regular Frontline rules (as listed above).
- Operational Support (33% chance): In this scenario, Combat Reserves' cooldown time is decreased by 50% (after the battle start, respawning, or unlocking a new reserve). More frequent use of Combat Reserves enhances combat dynamics and broadens the range of tactical possibilities.
- Twist of Fate (33% chance): On reaching certain Ranks you choose between two randomly selected Combat Reserves. Thus, you can sometimes even use combos of the same Reserves. Combat Reserves placed in slots in the Garage before battle have a better chance of being offered for selection, and the Level of Reserves purchased with Combat Reserve Points will increase by 1 in battle (so they will have 4 Levels).

The rules for the dynamic battle scenarios can be accessed in the Garage on the Frontline screen and on the Combat Reserves screen.
Activating Combat Reserves
When a Frontline Stage starts, all players have one Reserve of each category:
- Recon Flight
- Inspire
- Artillery Strike
To get access to other Reserves, you need to activate them using Combat Reserve Points that are awarded for reaching Frontline Tiers.
To activate a Reserve:
- Click the Frontline icon in the Garage.
- Go to the
 (Combat Reserves) section.
 - Select a Reserve and click Activate.

Reserves remain activated until the end of the current launch. To use them during the next Stage, you will need to activate them again.
Mounting Combat Reserves
If you want to use Combat Reserves during a battle, you have to mount them into slots before the battle starts.
Recon Flight, Inspire, and Artillery Strike are mounted onto all Tier VIII vehicles by default. However, you can replace them with other Reserves.
To mount a Reserve:
- Click the corresponding slot of the selected vehicle.
- Select a Reserve and click Apply to Vehicle.
- If you want to apply this Reserve to all vehicles of this type, select the checkbox and then click Apply to Type.

Economy Features
Since the rules for Frontline battles differ from those for Random Battles, the economy of the mode has its own features as well:
- The repair cost of a vehicle is irrespective of how many times it was destroyed during a battle. If your vehicle is destroyed several times, you pay the same as if it was destroyed just once.
- Credits are earned according to Random Battle formulas. However, a multiplying coefficient for credits in case of victory is not applied in Frontline. Instead of this, you additionally get 30,000 for victory and 10,000 for defeat.
- Depending on your rank reached in the battle, additional coefficients for experience are applied. As in Random Battles, you get a 50% bonus to your base experience in case of victory. This bonus does not affect your rank and Frontline Experience. It is distributed among all vehicles that you used during the battle depending on your performance in each vehicle.
All the rules mentioned above apply only if you fight for your team until the end of the battle. If you leave the battle before it is over, additional bonuses for credits and experience are not applied, and the cost of all repairs is charged in full.
In case of technical issues, you have 5 minutes to return to the battlefield and get all additional payments based on battle results.
Progression in Frontline
Frontline features a system of six ranks. You start a battle as a Private and progress through the ranks during combat. The rank Progression depends on how much experience you earn, which in turn depends on how efficient your actions are (e.g., capturing or defending bases, destroying main objectives, etc.). The total experience earned across all vehicles you use in the battle is counted. The more experience you earn, the higher your rank becomes.
The player with the highest General rank earns bonuses for the whole team. One General adds a +1.5% boost to the major qualification of all allied crew members. The maximum bonus that you can get is +15% when a team has 10 Generals. There may be more Generals on a team, but they will not deliver any additional bonuses.
The final rank at the end of the battle provides you with Frontline Experience and a bonus to Combat XP. This bonus is applied to the total base experience earned across all vehicles you used in the battle.
 Private |
 Sergeant |
 Lieutenant |
 Captain |
 Major |
 General |
|
| Frontline Experience | 0 | 150 |
350 |
600 |
900 |
1,200 |
| Bonus to Combat Experience | 0 | +10% | +25% | +50% | +100% | +200% |
Earning Frontline Experience allows you to reach higher Tiers. There are 20 Tiers in Frontline. Reaching each new Tier brings you rewards.
Frontline Experience to reach a new Tier
Expand| Tier | Frontline Experience Needed to Reach the Tier |
|---|---|
| 1 | 0 |
| 2 | 400 |
| 3 | 500 |
| 4 | 600 |
| 5 | 700 |
| 6 | 800 |
| 7 | 900 |
| 8 | 1,000 |
| 9 | 1,100 |
| 10 | 1,200 |
| 11 | 1,250 |
| 12 | 1,300 |
| 13 | 1,350 |
| 14 | 1,400 |
| 15 | 1,450 |
| 16 | 1,500 |
| 17 | 1,550 |
| 18 | 1,600 |
| 19 | 1,650 |
| 20 | 1,700 |


Combat Reserve Points
Combat Reserve Points are used to activate Combat Reserves. The number of Combat Reserve Points that you receive depends on the Tier you reach:
- Tier 5, 10 and 15: 3

- All the remaining Tiers, except 16-20: 1
Retraining Order
Retraining Order allows you to reset all skills and perks of any chosen crew member free of charge. Spent upon activation.

Rewards for Battle Performance
You can receive the following rewards for your effectiveness in battle:


Performance in the Mode
Frontline requires more system resources than Random Battles. This is due to several key factors that are specifically related to Frontline, including the map sizes, the large number of objects and vehicles on them, as well as the use of Combat Reserves. Players with low-spec CPUs and graphics cards may experience some performance issues when playing in Frontline. To avoid them and play with maximum comfort, change the graphics settings in your game client in accordance with the capabilities of your computer.
