Commanders,
Continuing the trend set up in the previous Top of The Tree special, the rest of the month will be focused on yet another heavyweight harbinger of the apocalypse! After all, Tier X battles aren’t for the faint of heart. Follow the research line leading to the Jagdpanzer E 100 and enjoy great discounts and credit income bonuses:
30 % discount on purchase and 30% more credits earned on the following German vehicles:
|
|
|


Use this opportunity to earn extra credits while driving these relentless tank destroyers, or get them for 70% of their normal value!
These bonuses will be available from 15th February at 06:10 until 1st March at 06:00 CET (GMT +1).
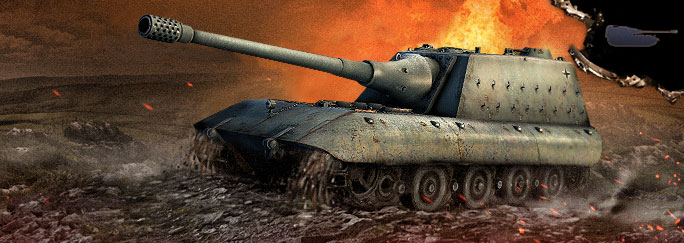
Jadgpanzer E 100
“Oh, that one looks tired. One 170mm sleeping pill coming right up!”
In-Game Performance
The Jagdpanzer E 100 is definitely the last vehicle you want to meet while attempting to break through the front line. If you underestimate this German colossus, expect to be squashed like an insect with little to no effort on its side. This unyielding mountain of steel is armed with a massive 17cm cannon capable of blowing anything it may encounter into oblivion with just one or two shots! It should be mentioned at this point that besides the world-ending alpha damage potential, this terrifying gun is also very accurate and capable of penetrating 299mm of armour with standard AP shells. Although you can use it for effective sniping, in many cases you can just shoot in the general direction of the enemy vehicle and still manage to turn it into a smouldering wreck!
Based on the E 100 chassis, this tank destroyer sports quite decent armour that is capable of deflecting a lot of incoming shells, especially if you angle it properly. Moreover, the immense weight of this vehicle makes it virtually immune to ramming. An enemy vehicle is rushing towards you? Just sit back and enjoy watching their petty little tank fold itself like an accordion upon impact. Last but not least, the Jagdpanzer E 100 is equipped with spaced armour on the sides, which provides additional protection against high explosive shells and even creates a chance of a zero-damage hit.
Dangerous as it is, this tank destroyer has many drawbacks that counterbalance its obscene destructive power. The most obvious one is the extremely poor mobility. This vehicle is slow, and when we say “slow” we mean the “can’t-even-compete-with-snails” type of slow. Unfortunately, this quality is also true of the reload time, which allows the vehicle to shoot just a little over two rounds per minute – on the battlefields, this is almost an eternity! In addition to this, the Jagdpanzer E 100 has a very narrow gun arc and poor depression that not only limits its repertoire of tactical manoeuvres but also creates a high chance that you will need to move while tracking the enemy –movement that will inevitably reset your aiming focus! The last point on this depressing list is the flaw that affects most German tanks – the tendency to suffer engine failure and fire when shot in the lower glacis. Not taking a Fire Extinguisher with you to battle is almost like volunteering for the glorified position of a camp bonfire.
The Jagdpanzer E 100 has as many upsides as it has drawbacks. Therefore it is a vehicle that needs to be handled in a very specific way in order to unleash its full potential. As always, the key to success is using the right tactics.
Tactics
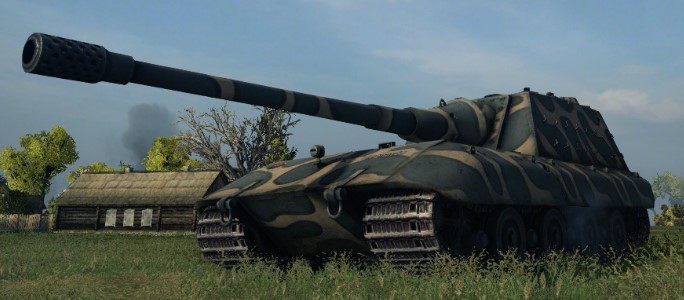
The Jagdpanzer E 100 is a perfect vehicle for use in urban areas with narrow streets and rubble piles. If you place yourself in a bottleneck passage and manage to hide your lower plate, you will become an almost immovable obstacle for the enemy. In these scenarios, your opponent will have virtually no chance of damaging you, while risking extreme losses in HP each time they peek out to aim at your small machine gun cupola. When in a hull down position, this is practically the only soft spot exposed to a frontal attack. However, because the cupola is located on the rear of your tall superstructure, it is very difficult to hit.
If you cannot hide your lower glacis, at least make sure that you angle it a bit each time you see the enemy preparing to fire at you. Even though it’s the biggest weak spot you have, it is still capable of deflecting most Tier VIII calibre guns. If you are facing your tier equal, however, you may want to consider exposing more of your side to the shooter. If you’re certain that they will damage you regardless of what you do, it might be better to take the hit to an area that has a lower chance of catching fire upon impact. Just make sure you retreat to a safer position afterwards.
When it comes to fighting on open terrain, your tactical approach is very simple – don’t go there. Ever. Remember that you are slow and cumbersome, and your size makes you visible from continents away. Sound familiar? That’s basically the definition of an “Arty Magnet” – if you’re spotted in the open, rest assured that you will win the Favourite Target of the Match Award. And no, it’s not a medal – it’s a free one-way ticket to the garage, gladly sponsored by the red team.
While fighting on an open map, your best option is to keep your distance from the front line and seek out anything that can serve as some form of cover. When you’re certain that you have a place of retreat to reload or avoid artillery fire, support your team by sniping at spotted enemy vehicles. Change your location only when you’re sure that there are no enemy vehicles in your immediate vicinity and/or that there is at least one allied vehicle with you to protect you from being flanked. Remember that you have no turret and even some light tanks can knock your HP down to zero if you let them get behind you (although it may take them a while).
Player Tip: Consider carrying a couple of HE shells with you at all times. Due to the high calibre, each HE shell contains a handsome payload of explosive material, comparable to that of some artillery shells. As a result, you will have the potential to heavily damage armoured enemies, even from the front. HE shells can also come in handy while fighting against multiple opponents in narrow corridors. HE shells of this calibre have quite a wide splash radius, which means that if you aim correctly you can damage multiple advancing vehicles with just one shell. If you’re lucky, you may even score the Bombardier medal, which is usually reserved for artillery.
In order to maximise your performance on the battlefield, we suggest mounting the following equipment:
| Improved Ventilation Class 3 | Large Caliber Tank Gun Rammer | Superheavy Spall Liner |
In addition, your crew members should learn the following skills and perks:
| Commander |  |
 |
 |
|---|---|---|---|
| Gunner |  |
|
|
| Driver |  |
|
|
| Radio Operator |  |
|
|
| First Loader |  |
|
|
| Second Loader | |
|
|
Using this setup, you will improve your horrid reload time and boost the vehicle’s general performance. What’s more, you will increase your chances of survival by reducing the probability of fire with Preventative Maintenance, andimprove your armour protection against explosions and artillery fire with the Superheavy Spall Liner. Please note that the Spall Liner also reduces the chance of having a crew member knocked out. It is a really handy option, especially as you don’t want anything to happen to either of your loaders. If you’re confident enough with the vehicle and know where to go on the map in order to minimise your exposure to enemy artillery, you may consider replacing the Superheavy Spall Liner with the Binocular Telescope – this way you improve your view range, which is also very important for tank destroyers.
If you’re planning to use HE shells with AP interchangeably, your loaders should definitely learn the Intuition perk. This way, you’ll have a 34% chance of switching between shell types immediately – it may save you a lot of time on reloading. Otherwise, replace Intuition with Safe Stowage and Adrenaline Rush, a different perk for each of your loaders.
History
While the Maus super-heavy tank was being designed by Porsche, Krupp decided to enter the race with a competitive design. The use of pre-existing components was the main build-point, with Krupp hoping that this would make his design more feasible.
The design was to use components from the Tiger II chassis, as well as the Maybach HL 230 engine. In order to accommodate the significantly underpowered engine (the same engine was used on the Panther series, and was underpowered even then), savings were made in the form of thinner armour, and narrowing and shortening of the vehicle.
The designers planned to reuse the turret from the Maus, which gave the vehicle its distinctive nickname: Tiger-Maus. Despite the concept being more pragmatic than the Maus design, Hitler favoured the more technically complex Maus project. As a result, Krupp was informed that the Tiger-Maus development should be stopped.
Krupp’s designs were passed down to Adler, who used them as a premise for the E series vehicles. However, priority was placed on the Maus, seriously obstructing the development of an E series prototype. By the end of the war only the chassis had been completed, although many concepts based on E series tanks were made.
By 1944 the idea to create a super-heavy tank destroyer mounting either the 15cm or 17cm gun appeared. Consideration was given to both the Maus and the E 100 as hosts for a tank destroyer conversion.
Due to technical incompatibilities with the Maus concept, there was more favour for Adler’s E 100. This gave birth to the conceptual idea of the Jagdpanzer E 100. However, before development could even start and with the end of the war approaching, Adolf Hitler ordered the discontinuation of super-heavy tank development.
Sources
JENTS, Thomas L. & DOYLE, Hilary Louis. Panzer Tracts No. 6-3 - Schwere Panzerkampfwagen Maus and E 100 : Development and production from 1942 to 1945
