Halloween 2023: Event Guide

It’s time to visit Mirny-13 again, Commanders! For two weeks that include a certain eerie holiday—from October 18 at 08:30 CEST (UTC+2) through November 2 at 07:30 CET (UTC+1)—you will be able to explore the former research town and finally unravel the secrets behind the strange phenomena and the nature of Mirium. During the Mirny: Lost Hope event, new dangers await you, including several new types of enemies and not one but three monstrous bosses. And, of course, the rewards for brave explorers will match the increased challenge, topped off by a brand-new Premium Tier VIII tank!


Event Summary

  • Battles take you back to Mirny-13, an abandoned research town. The contamination by Mirium—a substance with unexplained properties—has entered its next stage. This has had a visible effect on the area and the strange and aggressive entities that dwell there.
  • Before the battle starts, you can choose from three difficulty levels: Normal, Hard, or Nightmare. At the beginning of your campaign, you can only choose the Normal difficulty. Winning a battle on Normal will unlock the Hard difficulty. Once you prevail on Hard, the Nightmare difficulty will become available to you.
  • Fight as a team or Platoon of up to five players (Recon Squad) choosing from six specially adapted vehicles. Three of them are available at the start, and you can unlock the rest after completing certain Progression Stages or purchasing special bundles.
  • Combine consumables to empower your vehicle (and those of your allies). Match the gameplay specifics of different tanks and your tactics to increase your chances of survival.
  • Fight a variety of AI-driven armored enemies, each with their own unique behaviors, roles, and attacks.
  • Collect Mirium and deliver it to the special device called Magnus (shown on your minimap) before time runs out.
  • Once Magnus is filled with the required amount of Mirium, you will be teleported to a new Phase. Regardless of the difficulty level, there are four sequential Phases in a battle.
  • The fourth Phase of any Mirny: Lost Hope battle is a boss fight. The Immortal is the ultimate foe on Normal difficulty, and even more formidable enemies with unique abilities and tactics will confront you at the end of Hard and Nightmare difficulty battles.
  • If even a single player makes it to the next Phase, all the destroyed vehicles on the team respawn with 50% of their maximum HP. Survivors’ vehicles start the new Phase with 100% of their maximum HP.
  • At the beginning of each Phase, you will receive a random Anomaly that provides a unique bonus to your vehicle. The effects of Anomalies are not lost if your vehicle gets destroyed. If you make it to Phase 4, you will begin it with four active Anomalies.
  • While advancing through Phases and difficulty levels, you unlock Reels with encrypted information on the latest developments around Mirny-13 and the darkest secrets of this grim place. Decrypt Reels using Keys you obtain playing in the mode.
  • When you decipher a Reel, you also receive various goodies. Decrypting all 15 Reels brings you the ultimate prize: the Obsidian.

Difficulty Levels

When you join the event, you have access to the Normal difficulty level. Complete Phase 4 (the boss fight) on Normal to unlock the Hard difficulty. Once you deal with the boss on Hard, you will be able to set the difficulty level to Nightmare.

Regardless of the difficulty level, every battle consists of four Phases of increasing complexity. The AI-controlled opponents will get tougher and more numerous with each Phase. In Phases 2 and 3 on Normal difficulty and in Phases 1 through 3 on Hard and Nightmare difficulties, the Immortal will chase players.

Phase 4 is a boss fight, and the adversary you face depends on the difficulty level. On Normal, the players’ Recon Squad will face the Immortal; on Hard, the Corrupted M103; and on Nightmare, a [DATA REDACTED] enemy.

The Nightmare difficulty is just as tough as its name implies, so efficient team coordination is essential. Use the special tab in General Chat in the Garage to find trustworthy allies for your Recon Squad!

Bosses

Mirny-13 has changed a lot since our last visit. Strange powers present there have been disturbed by the latest events, and now there are not one but three monstrous bosses roaming the twisted landscape. Which one of them the players will engage in Phase 4 of the battle depends on the difficulty level.

  • Normal: The Immortal uses powerful HESH shells dealing tremendous damage when they penetrate your tank’s armor.
  • Hard: The Corrupted M103 wields twin guns that reload fast and fire salvos of AP rounds that can even get through heavies’ armor plates.
  • Nightmare: The [DATA REDACTED] is fast and maneuverable, and often uses speed boosts. Its mass, velocity, and [DATA REDACTED] at the front allow it to ram opponents to truly devastating effect.

You will face each boss in an Arena: a small part of the battlefield surrounded by energy walls. Crossing these causes damage to your vehicle and can result in its destruction. In Phase 4, bosses are vulnerable, and you will be able to see weak spots on their armor. Use special ammo you picked up earlier and your vehicle’s special abilities to deal extra damage.

Vulnerable spots in enemy armor
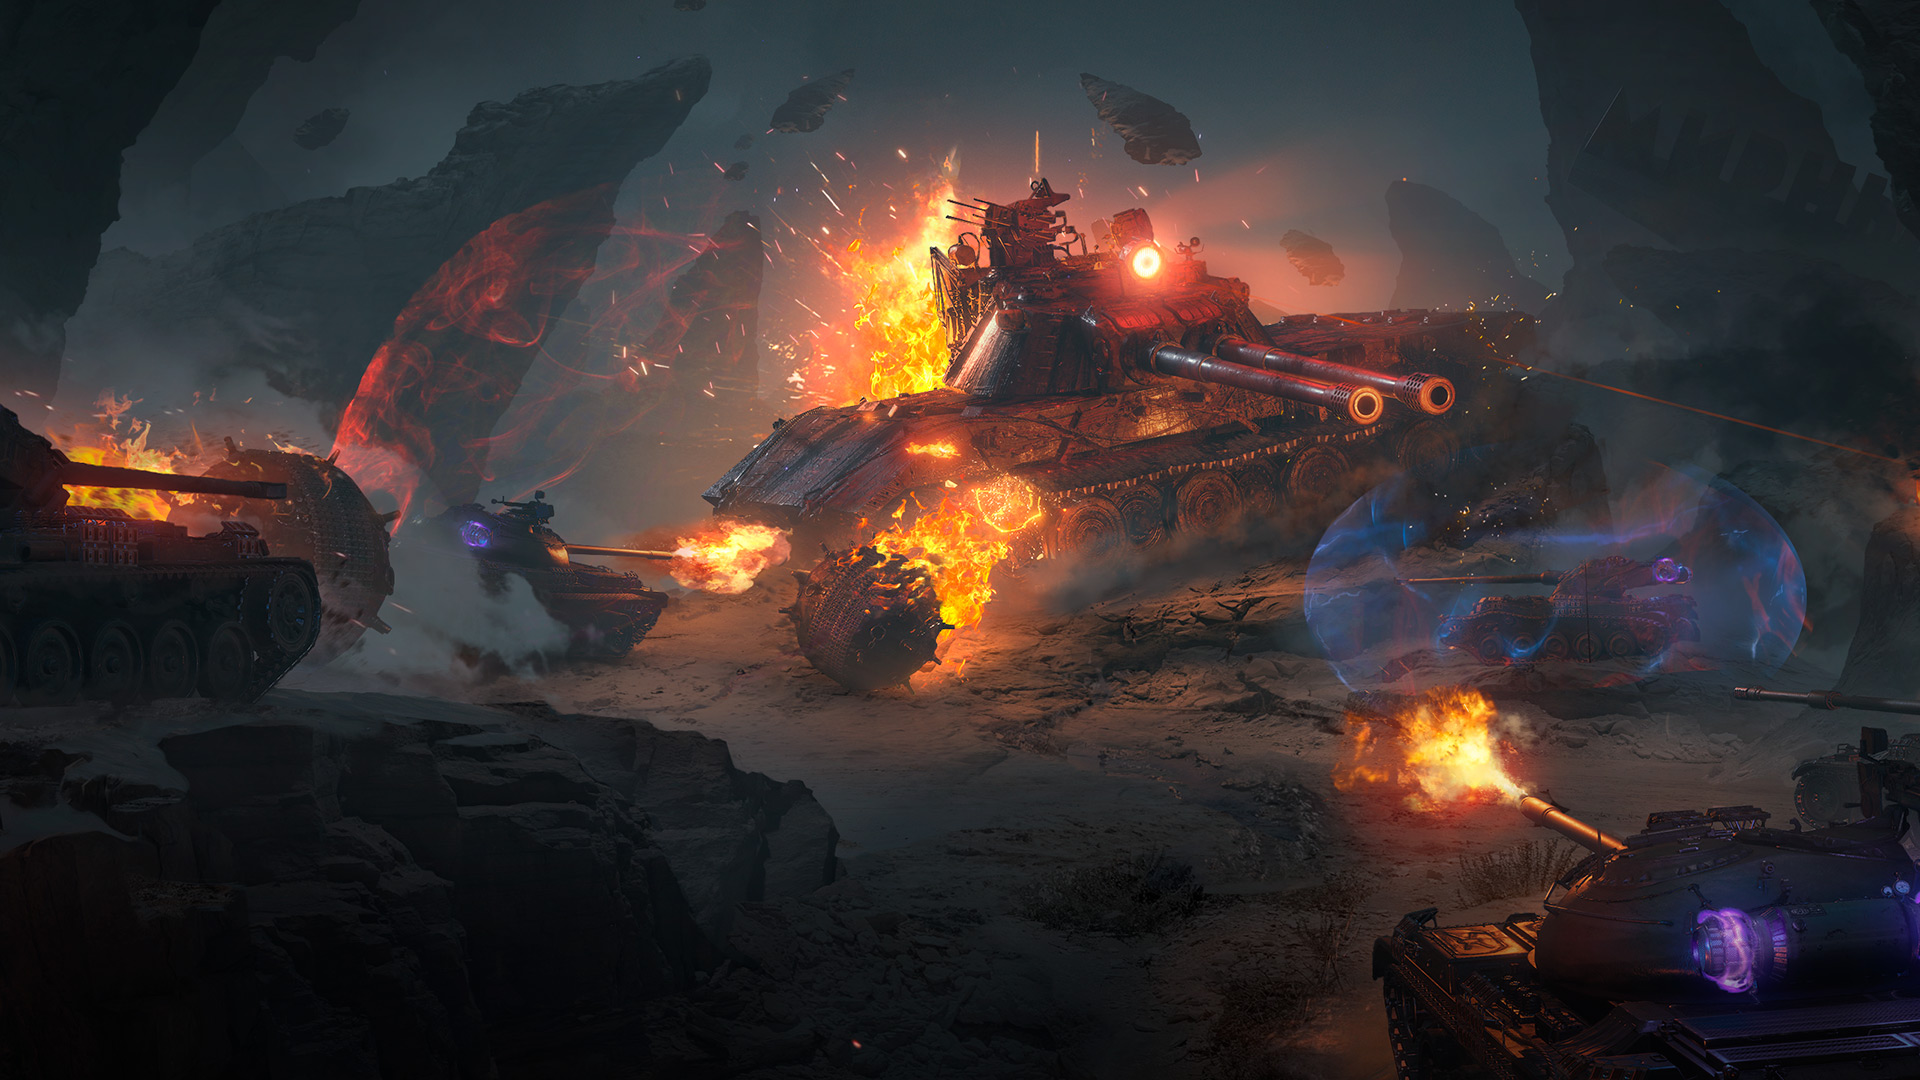
The image below shows how vulnerable spots in Phase 4 enemies’ armor look like. According to tankers’ battlefield reports, the exact number and location of these spots varies from battle to battle.

All bosses have an aura which will gradually sap your collected Mirium. Once your Mirium is depleted, the aura will begin to deal direct HP damage.

To beat a boss, your team must destroy it twice. After the first elimination, the monster tank will teleport out of the Arena, regain its strength, and return. If there were destroyed vehicles on the team, they will respawn too, with 50% of their maximum HP.

The Immortal will harass the team in its usual manner in Phases 2 and 3 on Normal difficulty and in Phases 1 through 3 on Hard and Nightmare difficulties. During these Phases, it will be invulnerable. Avoid its laser sight beam!

Enemies

The Mirium-infused armored opposition is even more diverse than before, with three new types (Trapper, Lost, Corrupted) making their debut. With every incremental Phase and difficulty level, your enemies become more numerous and aggressive.

Hedgehog

These black spherical self-propelled objects are equipped with spikes that make them look like naval mines. Hedgehogs can attack in groups or solo, and explode on impact with an enemy. This is their only means of inflicting harm. They move at high speed and change direction easily.

Once detected, Hedgehogs should become top priority targets for the team. Their lack of armor makes them extremely vulnerable.

Alpha Hedgehog

These large spherical self-propelled objects are similar to ordinary Hedgehogs in their characteristics and behavior, but they cause increased damage. Once destroyed, they shatter into several Hedgehogs.

When an Alpha Hedgehog is detected, the entire squad is strongly advised to focus on destroying it.

Rabbit

These highly maneuverable light combat vehicles do not engage in combat and retreat if possible, instead performing the function of scouts. They leave a fire trail as they move⁠—⁠probably due to fuel or lubrication system defects.

When destroyed, Rabbits tend to drop large amounts of Mirium.

Guard

These medium and heavy tanks attack in groups—and the more numerous they are, the more aggressively they act. They use somewhat primitive tactics and are therefore predictable in battle.

Guards pose a substantial threat when they act under the leadership of a command vehicle.

Alpha

These large, well-armored vehicles possess high firepower. Their behavior is aggressive, but not reckless: they will try not to expose their few vulnerable parts.

The team is advised to avoid attacking these adversaries head-on.

Hunter

This extremely dangerous enemy combat vehicle stands out due to its size and amazing survivability. It is well-protected and has only a few vulnerable spots.

Being extremely persistent, Hunters pursue their target until it is destroyed. There have been reports of them acting in groups of three.

Trapper

This light, maneuverable wheeled vehicle is somehow able to spawn destruction zones on the ground that deal high damage to player vehicles within them.

On spotting a Trapper, the team must immediately set it as their prime target and try to eliminate it as quickly as possible.

Lost

Exposure to Mirium caused these expedition tanks to switch sides. They are lightly armored but have considerable firepower and good mobility.

The Lost are medium-to-high priority targets. There have been reports of them acting in packs of three.

Corrupted

The Corrupted are dark counterparts of tanks on the team. As they have only recently succumbed to the influence of Mirium, they exhibit complex behavior in battle. Most importantly, they still can benefit from anomalies.

The Corrupted are extremely dangerous opponents. Good team coordination is required to deal with them.

The Immortal

This mechanical horror will chase tankers inside the anomaly and is indestructible most of the time. Now we know that it becomes vulnerable when cornered on the deepest layer of the anomaly. But that doesn‘t make this Mirium-soaked steel beast any less dangerous, or its HESH shells less devastating.

Corrupted M103

In this distorted, bloated machine, one can still recognize the Goliath—the modified version of the M103 used during the first expedition into the Mirny-13 area. Even heavy operators should not rely on their tanks’ armor when they face this monster spewing out salvos of AP rounds.

[DATA REDACTED]

Mirny-13 veterans say that when you enter the anomaly, you share your worst nightmares with it—and that sometimes Mirium will embody these nightmares in metal. This opponent proves that such stories are not delusions.

Minimap

The minimap is an essential tool for successfully completing your mission on any difficulty level—and not getting distracted by the contorted hellscape around you. Plot your route and plan your actions so that you can deliver the necessary amount of Mirium to Magnus in time!

Interactive image. The minimap is presented as an example for medium and high difficulty levels. Hover the cursor over objects on the minimap to view additional information. Objects on the minimap are for informational purposes only. Their positions can change at the beginning of each Phase.
First Phase
Second Phase
Third Phase
Fourth Phase

Here you will meet enemies of different types, which vary depending on the Phase. Destroy them and collect Mirium.

Here you will meet enemies of different types, which vary depending on the Phase. Destroy them and collect Mirium.

Here you will meet enemies of different types, which vary depending on the Phase. Destroy them and collect Mirium.

Here you will meet enemies of different types, which vary depending on the Phase. Destroy them and collect Mirium.

Here you will meet enemies of different types, which vary depending on the Phase. Destroy them and collect Mirium.

Here you will meet enemies of different types, which vary depending on the Phase. Destroy them and collect Mirium.

Here you will meet enemies of different types, which vary depending on the Phase. Destroy them and collect Mirium.

Here you will meet enemies of different types, which vary depending on the Phase. Destroy them and collect Mirium.

Magnus needs to be filled with Mirium so that your team can progress through Phases. It changes its location each Phase: The team will begin Phase 2 where Magnus used to be in Phase 1, and Phase 3 where Magnus used to be in Phase 2.

View Range. Displays the maximum distance at which your vehicle can spot enemies.

Draw Circle. Shows the maximum draw range for allied and enemy vehicles.

The Immortal will chase players in Phases 2 and 3 on Normal difficulty and in Phases 1 through 3 on Hard and Nightmare difficulties, and it will be invincible throughout all of them. The Immortal is the boss in Phase 4 on Normal difficulty where it becomes vulnerable.

Mirium is needed to activate Magnus so that your team can transfer to the next Phase.

Mirium is needed to activate Magnus so that your team can transfer to the next Phase.

Mirium is needed to activate Magnus so that your team can transfer to the next Phase.

Mirium is needed to activate Magnus so that your team can transfer to the next Phase.

Alternative ammo may drop out of destroyed enemies. Use it to deal increased damage to the bosses’ vulnerable spots.

Here you will meet enemies of different types, which vary depending on the Phase. Destroy them and collect Mirium.

Here you will meet enemies of different types, which vary depending on the Phase. Destroy them and collect Mirium.

Here you will meet enemies of different types, which vary depending on the Phase. Destroy them and collect Mirium.

Here you will meet enemies of different types, which vary depending on the Phase. Destroy them and collect Mirium.

Here you will meet enemies of different types, which vary depending on the Phase. Destroy them and collect Mirium.

Here you will meet enemies of different types, which vary depending on the Phase. Destroy them and collect Mirium.

Here you will meet enemies of different types, which vary depending on the Phase. Destroy them and collect Mirium.

Here you will meet enemies of different types, which vary depending on the Phase. Destroy them and collect Mirium.

Here you will meet enemies of different types, which vary depending on the Phase. Destroy them and collect Mirium.

Here you will meet enemies of different types, which vary depending on the Phase. Destroy them and collect Mirium.

Here you will meet enemies of different types, which vary depending on the Phase. Destroy them and collect Mirium.

Magnus needs to be filled with Mirium so that your team can progress through Phases. It changes its location each Phase: The team will begin Phase 2 where Magnus used to be in Phase 1, and Phase 3 where Magnus used to be in Phase 2.

View Range. Displays the maximum distance at which your vehicle can spot enemies.

Draw Circle. Shows the maximum draw range for allied and enemy vehicles.

The Immortal will chase players in Phases 2 and 3 on Normal difficulty and in Phases 1 through 3 on Hard and Nightmare difficulties, and it will be invincible throughout all of them. The Immortal is the boss in Phase 4 on Normal difficulty where it becomes vulnerable.

Mirium is needed to activate Magnus so that your team can transfer to the next Phase.

Mirium is needed to activate Magnus so that your team can transfer to the next Phase.

Mirium is needed to activate Magnus so that your team can transfer to the next Phase.

Alternative ammo may drop out of destroyed enemies. Use it to deal increased damage to the bosses’ vulnerable spots.

Alternative ammo may drop out of destroyed enemies. Use it to deal increased damage to the bosses’ vulnerable spots.

Alternative ammo may drop out of destroyed enemies. Use it to deal increased damage to the bosses’ vulnerable spots.

View Range. Displays the maximum distance at which your vehicle can spot enemies.

Which boss you will meet in Phase 4 depends on the difficulty level. Despite their might, every boss is vulnerable in this phase: Aim at the marked areas on its armor! Also, destroy the minions it will summon. Good luck!

Event Vehicles

You can participate in sorties into Mirny-13 in any of the six special vehicles able to travel and fight in this hostile environment. The Hornet, the Cerberus, and the Double are available from the start of the event, while the Legio Ferrata, the Malachite, and the Grenadier unlock when you decrypt Reels #1, #4, and #7 respectively. Alternatively, you can get the latter three as bonuses from special bundles in the in-game Store and the Premium Shop.

Phase Teleportation and Anomalies

Destroy armored AI enemies and collect enigmatic matter known as Mirium. It drops for each player individually: you will see only your own bits of Mirium, and no one else can pick them up—as long as your vehicle is operational.

Deliver gathered Mirium to a special Collector called Magnus marked on your minimap before time runs out. Once Magnus is filled with Mirium, your team needs to gather around it within the allotted time, and you will be able to teleport to the next Phase of battle. If you don't reach Magnus in time to teleport with the rest of your team, your vehicle will automatically be destroyed. But this doesn’t mean that the battle is over—you will respawn in the next Phase, albeit with half your HP and zero Mirium.

With each new Phase, the AI enemies become more dangerous, but the rewards increase: the more Phases you complete, the more credits and Decryption Keys you earn after the battle. Remember that it will be more difficult for you to navigate in each subsequent Phase, so always be on the lookout, and coordinate closely with teammates! 

Mirny-13 is an extremely hostile place: lone wolves do not survive. Only together can you make your stand against your opponents, so create Recon Squads and fight as a coordinated group! You should stay close to your teammates even when not playing in a Recon Squad for a better chance of victory.

At the beginning of each Phase, your vehicle will receive a random buff, or Anomaly. It will increase your effectiveness in combat and carry over from Phase to Phase even if your vehicle gets destroyed. In Phase 4, you will be able to benefit from four Anomalies.

There are nine types of Anomalies in the mode, and each vehicle has its own set of possible Anomalies.

Durability
Increases vehicle durability.
Mobility
Increases engine power and turret traverse speed.
Inspire
Improves crew performance.
Ceramic Core
Increases damage caused.
Hot Needle
Increases the chance to set an enemy vehicle on fire.
Vampire Bite
Can restore hit points upon causing damage by shooting.
Sniper
Reduces gun dispersion during movement and during hull and turret traverse.
Machine Gun
Increases reloading speed.
Invulnerability
Makes all vehicle modules invulnerable to any damage.
Regeneration
Gradually restores your vehicle's hit points. The effect is interrupted upon receiving damage.

Bonus Missions for Specific Vehicles

Available from 2023-10-18 at 00:30:00 (UTC) through 2023-11-02 at 06:30:00 (UTC)

Mirny: Lost Hope introduces striking brand-new 3D styles for the  X Centurion Action X VIII Bofors Tornvagn , and  VIII Panhard AML Lynx 6x6 . But having some, or all, of these vehicles in your arsenal has an additional benefit: You can use them to earn valuable Mirny mode Combat Abilities in the following missions!

  • Centurion Action X
  • Bofors Tornvagn
  • Panhard AML Lynx 6×6
Centurion Action X

Rewards:

  • 1 Combat Ability: Group Repairs
  • 1 Combat Ability: Invisibility
  • 1 Combat Ability: Lifesteal

Objectives:

  • Be one of the top 7 XP earners on your team in a battle

Restrictions:

Bofors Tornvagn

Rewards:

  • 1 Combat Ability: Cyclic Loading
  • 1 Combat Ability: Energy Shield
  • 1 Combat Ability: Magazine Loading

Objectives:

  • Be one of the top 7 XP earners on your team in a battle

Restrictions:

Panhard AML Lynx 6×6

Rewards:

  • 1 Combat Ability: Emergency Repairs
  • 1 Combat Ability: Energy Strike
  • 1 Combat Ability: Pyrokinesis

Objectives:

  • Be one of the top 7 XP earners on your team in a battle

Restrictions:

Consumables

To increase the battle efficiency of your vehicle (and sometimes of those of your allies) in Mirny-13, make sure to use the special consumables. Before the battle starts, you can equip three of the nine available for credits. Match the consumables with the abilities of your vehicle and your playstyle!

Pyrokinesis
Temporarily sets enemy vehicles on fire within a 25 m radius.
Energy Strike
Causes immediate damage to enemy vehicles within a 25 m radius.
Lifesteal
Restores your vehicle's HPs by stealing them from enemy vehicles within a 25 m radius. Extinguishes fire.
Emergency Repairs
Instantly restores 400 HPs and an extra 300 HPs within 30 s. Extinguishes fire and repairs damaged modules.
Group Repairs
Instantly repairs modules, extinguishes fire, and restores some HPs to allied vehicles within the effect radius.
Energy Shield
Protects your vehicle from any damage except ramming, drowning, and impact for 7 s.
Magazine Loading
Provides instant reloading for: Hornet, Grenadier, Double, Legio Ferrata.
Cyclic Loading
Significantly accelerates the rate of fire for a period of time for: Malachite, Cerberus.
Invisibility
Makes your vehicle invisible to enemies for 15 s. Shooting or causing damage to an enemy will reveal your position.

Turbocharger comes for free for all event vehicles. It accelerates your vehicle for a limited time and increases the damage caused by ramming. This reusable ability has a cooldown and does not take up a slot.

When the Mirny: Lost Hope event ends, unused special consumables will disappear, with 50% of their credit value compensated.

Mode Economy

All shells and vehicle repairs in the event are free, but XP, Crew XP, and Free XP cannot be earned. For completing each Phase of a battle, you are awarded a fixed amount of credits which depends on the difficulty level.

DIFFICULTY LEVEL Normal hard nightmare
PHASE 1 5,000  10,000  15,000 
PHASE 2 10,000  15,000  15,000 
PHASE 3 10,000  15,000  20,000 
PHASE 4 (BOSS FIGHT) 20,000  20,000  50,000 
MAXIMUM CREDITS
PER BATTLE
45,000  60,000  100,000 

Reels and Event Progression

The Mirny: Lost Hope event has a rich backstory contained on 15 encrypted Reels. You will receive these info packages one by one on completing certain Phases at different difficulty levels or on meeting other battle-related criteria.

To decipher the Reels (and get the additional rewards associated with each) you will need Decryption Keys which can be obtained from several sources.

  • Event battles: The number of Keys depends on the difficulty level, Phases completed, damage dealt, and Mirium delivered to Magnus.

Keys Awarded for Battles

Expand
DIFFICULTy PLACE IN THE TEAM BY PERFORMANCE PHASE 1 PHASE 2 PHASE 3 PHASE 4
NORMAL 1 1 2 3 3
2 0 1 2 2
3 0 1 2 2
4 0 1 1 2
5 0 1 1 1
HARD 1 1 3 4 4
2 1 2 3 3
3 1 1 2 3
4 0 1 2 2
5 0 1 1 2
NIGHTMARE 1 1 3 5 5
2 1 3 4 4
3 1 2 3 4
4 1 2 2 3
5 1 1 2 3
Collapse
  • Daily event mission: Deliver 100 Mirium to Magnus to receive 1 Key (can be done once per day in every special vehicle; up to 6 times per day in total).
  • Special bundles in the in-game Store and the Premium Shop: Keys come as gifts on top of valuable in-game items.

When the Mirny: Lost Hope event ends, unused Decryption Keys will disappear with no compensation.

You can decrypt Reels in any order after they are unlocked. For each Reel you decrypt, you will receive rewards that include event-inspired decals, Personal Reserves, days of WoT Premium Account, Crew Books, Retraining Orders, Battle Pass Points, credits, bonds, and other prizes. The top reward is the Obsidian: a brand-new Premium Tier VIII medium tank with an imposing exterior.

  • REEL #1
  • REEL #2
  • REEL #3
  • REEL #4
  • REEL #5
  • REEL #6
  • REEL #7
  • REEL #8
  • REEL #9
  • REEL #10
  • REEL #11
  • REEL #12
  • REEL #13
  • REEL #14
  • REEL #15
  • REEL #16
REEL #1

Requirements:
Complete Phase 2 on Normal difficulty

Keys to decrypt:
10

Additional rewards:

  • ×1 +50% to XP
  • ×6 Mobility Mark decals
  • Legio Ferrata unlocked
REEL #2

Requirements:
Complete Phase 3 on Normal difficulty

Keys to decrypt:
10

Additional rewards:

  • ×2 Demounting Kits
  • 100,000 credits
REEL #3

Requirements:
Deal 30,000 damage to Guards over any number of battles

Keys to decrypt:
10

Additional rewards:

  • 1 Day of WoT Premium Account
  • 100 Battle Pass Points
REEL #4

Requirements:
Complete Phase 4 on Normal difficulty

Keys to decrypt:
10

Additional rewards:

  • ×1 Personal Training Manual
  • 100 bonds
  • Malachite unlocked
REEL #5

Requirements:
Complete Phase 1 on Hard difficulty

Keys to decrypt:
20

Additional rewards:

  • ×6 Firepower Mark decals
  • 100,000 credits
REEL #6

Requirements:
Complete Phase 2 on Hard difficulty

Keys to decrypt:
20

Additional rewards:

  • ×3 Demounting Kits
  • ×2 +50% to credits
REEL #7

Requirements:
Complete Phase 3 on Hard difficulty

Keys to decrypt:
20

Additional rewards:

  • 2 Days of WoT Premium Account
  • 100 Battle Pass Points
  • Grenadier unlocked
REEL #8

Requirements:
Deal 10,000 damage to the Corrupted over any number of battles

Keys to decrypt:
20

Additional rewards:

  • ×3 Retraining Orders
  • ×1 +100% to XP
REEL #9

Requirements:
Deal 6,000 damage to Hunters over any number of battles

Keys to decrypt:
20

Additional rewards:

  • ×6 Invincibility Mark decals
  • ×1 +100% to credits
REEL #10

Requirements:
Complete Phase 4 on Hard difficulty

Keys to decrypt:
20

Additional rewards:

  • ×1 Personal Training Manual
  • 100 bonds
REEL #11

Requirements:
Complete Phase 1 on Nightmare difficulty

Keys to decrypt:
30

Additional rewards:

  • 50 bonds
  • 200,000 credits
REEL #12

Requirements:
Complete Phase 2 on Nightmare difficulty or spend 50 Keys

Keys to decrypt:
30

Additional rewards:

  • ×5 Demounting Kits
  • 200 Battle Pass Points
REEL #13

Requirements:
Complete Phase 3 on Nightmare difficulty or spend 50 Keys

Keys to decrypt:
30

Additional rewards:

  • ×5 Retraining Orders
  • ×3 +100% to XP
REEL #14

Requirements:
Deal 5,000 damage to the Lost over any number of battles or spend 50 Keys

Keys to decrypt:
30

Additional rewards:

  • 200 bonds
  • ×3 +100% to credits
REEL #15

Requirements:
Complete Phase 4 on Nightmare difficulty or spend 100 Keys

Keys to decrypt:
30

Additional rewards:

  • ×1 Universal Manual
  • 3 Days of WoT Premium Account
REEL #16

Requirements:
Decipher all the other Reels

Keys to decrypt:

Additional rewards:

  • The Obsidian, 100% crew and Garage slot
  • The Returned medal

Reels #12 through #15 can also be unlocked for Decryption Keys (see the exact numbers above).

The Obsidian

The vehicle you receive for decrypting all the Reels looks like no other tank. It will serve as a reminder of victory over the final boss of the event to those who managed to beat the Nightmare difficulty level.

Along with a unique exterior, the Obsidian boasts a compact and sturdy turret, an excellent rate of fire, and good gun handling. Getting it is totally worth the effort!

The parameters displayed are valid for the vehicle with each crew member trained to 100% major qualification level. Some vehicle characteristics can be further improved with the Commander's bonus to major qualification level, crew perks, and special in-game items.
Main Characteristics
Firepower
Survivability
Mobility
Obsidian
VIII
Average Damage
200/200/280
 HP
Average Penetration
212/242/50
 mm
Hit Points
1,300
 HP
Top Speed / Reverse Speed
42/16
 km/h
Commander (Radio Operator)
Gunner
Driver
Loader
Firepower
Average Damage
200/200/280
 HP
Ammunition
60
 shells
Average Penetration
212/242/50
 mm
Gun Reload Time
5.2
 s
Dispersion at 100 m
0.34
 m
Gun Depression / Elevation Angles
−6/20
 deg
Aiming Time
2
 s
Shell Types
Shell Velocity
AP
1,100
 m/s
APCR
1,300
 m/s
HE
1,100
 m/s
The 85 mm N-3-457O gun has excellent accuracy, armor penetration, and rate of fire. Destroy an enemy’s track and make full use of your damage per minute!
Survivability
Hit Points
1,300
 HP
Hull Armor
120/65/40
 mm
Signal Range
625
 m
Turret Armor
205/100/40
 mm
View Range
380
 m
Turret Traverse Speed
36
 deg/s
Both the hull and the turret are well protected, with high effective armor values due to sloped plates. Together with side screens and a low silhouette, this makes the tank a true survivor. Use cover wisely to complement its strengths!
Mobility
Engine Power
520
 h.p.
Specific Power
13
 h.p./t
Traverse Speed
30
 deg/s
Top Speed / Reverse Speed
42/16
 km/h
The 520 h.p. engine gives this 40 ton medium tank a modest specific power of 13 h.p. per ton of weight and the general mobility of a heavy. In battle, stick with heavy tanks and add your firepower to the combined might of the pack!
   

3D Styles and More

During the Mirny: Lost Hope event, you can obtain a variety of awe-inspiring and macabre 3D styles in the in-game Store for gold. Three of these Mirny-13-themed 3D styles are brand-new:

 
Barbed Wire
The tank is wrapped in barbed wire as if its crew was trying not to let someone (or something) climb up its armor.
 
Night-Vision Devices
Two first-generation night-vision devices with infrared spotlights to operate in conditions of limited visibility.
 
Side Screens
Net screens for vehicle demagnetization when transiting between Phases.
 
Bustle Rack
A bustle rack for spare parts and repairs equipment. Mounted instead of the Impulse collector that exploded due to overload.
 
Color Scheme
Mirium is etched permanently into this tank's armor: its stains appear after any type of cleaning. However, it doesn't reduce the vehicle's durability—quite the opposite.
 
Reinforced Headlights
Four powerful headlights that should disperse the eternal darkness of the rift. On this vehicle, they occasionally flicker like the eyes of a sleepy beast.
SYMBIOTE 3D STYLE FOR THE CENTURION ACTION X
 
Fuel Canisters
Auxiliary fuel reserve for better vehicle autonomy. Indispensable for long-distance expeditions.
 
Spare Parts
A bustle rack with spare parts.
 
Machine Guns
Two external machine guns against lightly armored vehicles and enemy personnel. They are controlled remotely.
 
Mortars for Putting Up Smoke Screens
These mortars can hide the tank from the enemy and provide an opportunity for an unexpected maneuver.
 
Protective Screens
Increase wheel protection against high-explosive damage.
 
Autocannon
Automatic cannon for engaging lightly armored vehicles. It is controlled remotely.
PROTEUS 3D STYLE FOR THE BOFORS TORNVAGN
 
Impulse System
Mounted on the outer hull, the Impulse system is designed for capturing any type of low-temperature plasma, processing it, and using it to improve the characteristics of the vehicle inside the anomaly zone. The unit is fully serviceable and ready to use.
 
Blade
Added for removing obstacles. It can also provide some protection against high-explosive damage, but you shouldn't rely on that too much. This vehicle's best protection is its mobility.
 
Wheels
Chains are put on the wheels to increase traction with the ground. This improves the vehicle's general crossing capacity.
 
Headlights
Four powerful headlights replacing standard lights. Designed for operating in conditions of limited visibility.
 
Gun Mantlet Cover
Increases vehicle protection against the aggressive environment.
 
Spare Wheel
You can wait for help for a very long time in the anomaly conditions. That's why it's best to always have spare parts for emergency repairs with you.
3D STYLE TRAPPER FOR THE PANHARD AML LYNX 6X6

Decrypt Reels #1, #5, and #9 to get your hands on the three special decals oozing (not literally) the twilight essence of Mirny-13.

Win on Hard and Nightmare difficulty to earn the badges, and decrypt all 15 Reels to receive the medal!

Soundtrack

Mirny-13 has changed further, becoming even more strange and alien, and this is reflected in the music. Listen to the tracks and feel the spirit of this dark and twisted place!

WoT Music Team, Ilya Tereshchuk Mirny: Lost Hope. Main Theme 01 - Mirny Lost Hope. Main Theme
WoT Music Team, Ilya Tereshchuk Fight Back: Obsidian 02 - Fight Back Obsidian
WoT Music Team, Vitali Harmash The Lost 03 - The Lost
WoT Music Team, Vitali Harmash Return of the Immortal 04 - Return of the Immortal
WoT Music Team, Ilya Tereshchuk Fight Back: Corrupted 05 - Fight Back Corrupted
WoT Music Team, Vitali Harmash Victory at all cost 06 - Victory at all coast
WoT Music Team, Vitali Harmash No Way Back 07 - No Way Back
WoT Music Team, Ilya Tereshchuk Fight Back: Immortal 08 - Fight Back Immortal
WoT Music Team, Ilya Tereshchuk Hope Remains 09 - Hope Remains
WoT Music Team, Ilya Tereshchuk Quants: Closed 10 - Quants Closed
WoT Music Team, Ilya Tereshchuk Quants: Encrypted 11 - Quants Encrypted
WoT Music Team, Ilya Tereshchuk Quants: Decrypted 12 - Quants Decrypted
WoT Music Team, Vitali Harmash, Ilya Tereshchuk Back Home 13 - Back Home

Known Issues

Expand
  • Players with low-spec CPUs and graphics cards may experience some stability and performance issues (including FPS drops) when running the mode. To avoid them and to play with maximum comfort, change the graphics settings in your game client in accordance with the capabilities of your CPU and graphics card.
  • Re-logging in to the game during a battle (for example, if internet connection has been lost) may be followed by minor UI and visual effects glitches.
  • While using Minimum or Low graphics presets, clicking on any Halloween 3D style displayed in the Garage may cause the terrain texture to disappear for a moment.
  • Replays are not fully supported for event battles, but they can be recorded. While watching these replays, UI elements may disappear (this is more likely to happen when the fast-forward function is used).
Collapse

Good luck, Commanders! Play as a team, take on powerful enemies and bosses, uncover the secrets of Mirny-13, and earn the Obsidian and all the other great rewards!

Discuss on Discord

Close